Patchwork is more than just piecing fabrics together. It’s a creative and fulfilling craft that allows crafters, sewers, and DIYers to bring their artistic visions to life. Whether you’re creating a quilt, a pillow cover, or a decorative wall hanging, mastering the techniques of patchwork is crucial for achieving flawless results.
By focusing on precision, planning, and skills, you’ll elevate your creations and enjoy the process. Read these tips and tricks to master your patchwork process!
Select the Right Fabrics
Great patchwork starts with thoughtful fabric selection. High-quality fabrics improve the durability and aesthetic appeal of your piece. When selecting fabrics, consider how their weights and textures will complement one another. For example, lightweight cottons are great for beginners because they’re forgiving and easy to sew.
Mixing fabric weights, such as denim with silk, might look intriguing but is challenging to manage because of uneven stretching during sewing. Keep an eye on color palettes and patterns. Fabrics that visually harmonize will give your piece a cohesive finish, especially when creating intricate designs.
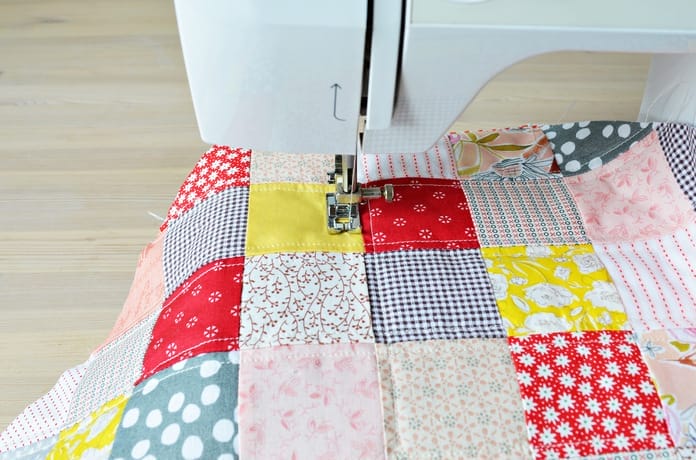
Accurate Cutting Techniques
Precision is everything in patchwork, and accurate cutting lays the foundation for success. Cutting mistakes lead to mismatched pieces and uneven seams, so it’s worth investing in quality tools. A rotary cutter offers faster and cleaner cuts than scissors, while a self-healing cutting mat protects your workspace.
Use clear acrylic rulers to measure and cut precisely. Take the time to align your fabric and check your measurements before cutting. Rushing this step can lead to frustration later in the process.
Master Seam Allowances
Patchwork relies on maintaining consistent seam allowances so that all the pieces fit together perfectly. Most patchwork pieces use quarter-inch seam allowances, so develop accuracy in this measurement. A presser foot specifically designed for quarter-inch seams will guide you as you sew.
If you’re just starting out with patchwork, you can mark the seam allowance on your sewing machine plate with painter’s tape for guidance. By sticking to consistent seam allowances, you’ll create pieces that align perfectly and look great.
Press for Perfection
Many beginners mistake ironing for pressing, but the two are entirely different in patchwork. Pressing involves gently lifting the iron and placing it down, as opposed to sliding it back and forth. This method prevents stretching your fabrics out of shape.
Pressing seams flat strengthens the stitches and creates a clean surface for assembly. Always press seams in the same direction to reduce bulk, especially for layered pieces. Taking the time to press each component will improve the appearance of your patchwork.
Plan Your Layout
Before sewing your patches together, take a moment to plan the layout. This step saves you time and prevents inconsistencies in your design. Design walls or boards are fantastic for visualizing how your finished piece will look. You can arrange and rearrange your patches until you’re satisfied!
Beginners who are unsure where to start can read a beginner’s guide to getting started in quilting for advice. Breaking down your project into sections will make layouts feel more manageable. Once you finalize your design, take a photo for reference during assembly.
Mastering your patchwork process isn’t something that happens overnight. With these tips and plenty of practice, your skills will grow. By refining techniques like fabric selection, precise cutting, and pressing, your creations will take on a professional quality.
- Pittsburgh Better Times
- Pittsburgh Better Times
- Pittsburgh Better Times
- Pittsburgh Better Times
- Pittsburgh Better Times
- Pittsburgh Better Times
- Pittsburgh Better Times
- Pittsburgh Better Times
- Pittsburgh Better Times
- Pittsburgh Better Times
- Pittsburgh Better Times
- Pittsburgh Better Times
- Pittsburgh Better Times
- Pittsburgh Better Times
- Pittsburgh Better Times
- Pittsburgh Better Times
- Pittsburgh Better Times
- Pittsburgh Better Times
- Pittsburgh Better Times
- Pittsburgh Better Times
- Pittsburgh Better Times
- Pittsburgh Better Times
- Pittsburgh Better Times
- Pittsburgh Better Times
- Pittsburgh Better Times
- Pittsburgh Better Times
- Pittsburgh Better Times
- Pittsburgh Better Times
- Pittsburgh Better Times
- Pittsburgh Better Times
- Pittsburgh Better Times
- Pittsburgh Better Times
- Pittsburgh Better Times
- Pittsburgh Better Times
- Pittsburgh Better Times
- Pittsburgh Better Times
- Pittsburgh Better Times
- Pittsburgh Better Times
- Pittsburgh Better Times
- Pittsburgh Better Times
- Pittsburgh Better Times
- Pittsburgh Better Times
- Pittsburgh Better Times
- Pittsburgh Better Times
- Pittsburgh Better Times
- Pittsburgh Better Times
- Pittsburgh Better Times
- Pittsburgh Better Times
- Pittsburgh Better Times
- Pittsburgh Better Times
- Pittsburgh Better Times
- Pittsburgh Better Times
- Pittsburgh Better Times
- Pittsburgh Better Times
- Pittsburgh Better Times
- Pittsburgh Better Times
- Pittsburgh Better Times
- Pittsburgh Better Times
- Pittsburgh Better Times
- Pittsburgh Better Times
- Pittsburgh Better Times
- Pittsburgh Better Times
- Pittsburgh Better Times
- Pittsburgh Better Times
- Pittsburgh Better Times
- Pittsburgh Better Times
- Pittsburgh Better Times
- Pittsburgh Better Times
- Pittsburgh Better Times
- Pittsburgh Better Times
- Pittsburgh Better Times
- Pittsburgh Better Times
- Pittsburgh Better Times
- Pittsburgh Better Times
- Pittsburgh Better Times
- Pittsburgh Better Times
- Pittsburgh Better Times
- Pittsburgh Better Times
- Pittsburgh Better Times
- Pittsburgh Better Times
- Pittsburgh Better Times
- Pittsburgh Better Times
- Pittsburgh Better Times
- Pittsburgh Better Times
- Pittsburgh Better Times
- Pittsburgh Better Times
- Pittsburgh Better Times
- Pittsburgh Better Times
- Pittsburgh Better Times
- Pittsburgh Better Times
- Pittsburgh Better Times
- Pittsburgh Better Times
- Pittsburgh Better Times
- Pittsburgh Better Times
- Pittsburgh Better Times
- Pittsburgh Better Times
- Pittsburgh Better Times
- Pittsburgh Better Times
- Pittsburgh Better Times
- Pittsburgh Better Times
- Pittsburgh Better Times
- Pittsburgh Better Times
- Pittsburgh Better Times
- Pittsburgh Better Times
- Pittsburgh Better Times
- Pittsburgh Better Times
- Pittsburgh Better Times
- Pittsburgh Better Times
- Pittsburgh Better Times
- Pittsburgh Better Times
- Pittsburgh Better Times
- Pittsburgh Better Times
- Pittsburgh Better Times
- Pittsburgh Better Times
- Pittsburgh Better Times
- Pittsburgh Better Times
- Pittsburgh Better Times
- Pittsburgh Better Times
- Pittsburgh Better Times
- Pittsburgh Better Times
- Pittsburgh Better Times
- Pittsburgh Better Times
- Pittsburgh Better Times
- Pittsburgh Better Times
- Pittsburgh Better Times
- Pittsburgh Better Times
- Pittsburgh Better Times
- Pittsburgh Better Times
- Pittsburgh Better Times
- Pittsburgh Better Times
- Pittsburgh Better Times
- Pittsburgh Better Times
- Pittsburgh Better Times
- Pittsburgh Better Times
- Pittsburgh Better Times
- Pittsburgh Better Times
- Pittsburgh Better Times
- Pittsburgh Better Times
- Pittsburgh Better Times
- Pittsburgh Better Times
- Pittsburgh Better Times
- Pittsburgh Better Times
- Pittsburgh Better Times
- Pittsburgh Better Times
- Pittsburgh Better Times
- Pittsburgh Better Times
- Pittsburgh Better Times
- Pittsburgh Better Times
- Pittsburgh Better Times
- Pittsburgh Better Times
- Pittsburgh Better Times
- Pittsburgh Better Times
- Pittsburgh Better Times
- Pittsburgh Better Times
- Pittsburgh Better Times
- Pittsburgh Better Times
- Pittsburgh Better Times
- Pittsburgh Better Times
- Pittsburgh Better Times
- Pittsburgh Better Times
- Pittsburgh Better Times
- Pittsburgh Better Times
- Pittsburgh Better Times
- Pittsburgh Better Times
- Pittsburgh Better Times
- Pittsburgh Better Times
- Pittsburgh Better Times
- Pittsburgh Better Times
- Pittsburgh Better Times
- Pittsburgh Better Times
- Pittsburgh Better Times
- Pittsburgh Better Times
- Pittsburgh Better Times
- Pittsburgh Better Times
- Pittsburgh Better Times
- Pittsburgh Better Times
- Pittsburgh Better Times
- Pittsburgh Better Times
- Pittsburgh Better Times
- Pittsburgh Better Times
- Pittsburgh Better Times
- Pittsburgh Better Times
- Pittsburgh Better Times
- Pittsburgh Better Times
- Pittsburgh Better Times
- Pittsburgh Better Times
- Pittsburgh Better Times
- Pittsburgh Better Times
- Pittsburgh Better Times
- Pittsburgh Better Times
- Pittsburgh Better Times
- Pittsburgh Better Times
- Pittsburgh Better Times
- Pittsburgh Better Times
- Pittsburgh Better Times
- Pittsburgh Better Times
- Pittsburgh Better Times
- Pittsburgh Better Times
- Pittsburgh Better Times
- Pittsburgh Better Times
- Pittsburgh Better Times
- Pittsburgh Better Times
- Pittsburgh Better Times
- Pittsburgh Better Times
- Pittsburgh Better Times
- Pittsburgh Better Times
- Pittsburgh Better Times
- Pittsburgh Better Times
- Pittsburgh Better Times
- Pittsburgh Better Times
- Pittsburgh Better Times
- Pittsburgh Better Times
- Pittsburgh Better Times
- Pittsburgh Better Times
- Pittsburgh Better Times
- Pittsburgh Better Times
- Pittsburgh Better Times
- Pittsburgh Better Times
- Pittsburgh Better Times
- Pittsburgh Better Times
- Pittsburgh Better Times
- Pittsburgh Better Times
- Pittsburgh Better Times
- Pittsburgh Better Times
- Pittsburgh Better Times
- Pittsburgh Better Times
- Pittsburgh Better Times
- Pittsburgh Better Times
- Pittsburgh Better Times
- Pittsburgh Better Times
- Pittsburgh Better Times
- Pittsburgh Better Times
- Pittsburgh Better Times
- Pittsburgh Better Times
- Pittsburgh Better Times
- Pittsburgh Better Times
- Pittsburgh Better Times
- Pittsburgh Better Times
- Pittsburgh Better Times
- Pittsburgh Better Times
- Pittsburgh Better Times
- Pittsburgh Better Times
- Pittsburgh Better Times
- Pittsburgh Better Times
- Pittsburgh Better Times
- Pittsburgh Better Times
- Pittsburgh Better Times
- Pittsburgh Better Times
- Pittsburgh Better Times
- Pittsburgh Better Times
- Pittsburgh Better Times
- Pittsburgh Better Times
- Pittsburgh Better Times
- Pittsburgh Better Times
- Pittsburgh Better Times
- Pittsburgh Better Times
- Pittsburgh Better Times
- Pittsburgh Better Times
- Pittsburgh Better Times
- Pittsburgh Better Times
- Pittsburgh Better Times
- Pittsburgh Better Times
- Pittsburgh Better Times
- Pittsburgh Better Times
- Pittsburgh Better Times
- Pittsburgh Better Times
- Pittsburgh Better Times
- Pittsburgh Better Times
- Pittsburgh Better Times
- Pittsburgh Better Times
- Pittsburgh Better Times
- Pittsburgh Better Times
- Pittsburgh Better Times
- Pittsburgh Better Times
- Pittsburgh Better Times
- Pittsburgh Better Times
- Pittsburgh Better Times
- Pittsburgh Better Times
- Pittsburgh Better Times
- Pittsburgh Better Times
- Pittsburgh Better Times
- Pittsburgh Better Times
- Pittsburgh Better Times
- Pittsburgh Better Times
- Pittsburgh Better Times
- Pittsburgh Better Times
- Pittsburgh Better Times
- Pittsburgh Better Times
- Pittsburgh Better Times
- Pittsburgh Better Times
- Pittsburgh Better Times
- Pittsburgh Better Times
- Pittsburgh Better Times
- Pittsburgh Better Times
- Pittsburgh Better Times
- Pittsburgh Better Times
- Pittsburgh Better Times
- Pittsburgh Better Times
- Pittsburgh Better Times
- Pittsburgh Better Times
- Pittsburgh Better Times
- Pittsburgh Better Times
- Pittsburgh Better Times
- Pittsburgh Better Times
- Pittsburgh Better Times
- Pittsburgh Better Times
- Pittsburgh Better Times
- Pittsburgh Better Times
- Pittsburgh Better Times
- Pittsburgh Better Times
- Pittsburgh Better Times
- Pittsburgh Better Times
- Pittsburgh Better Times
- Pittsburgh Better Times
- Pittsburgh Better Times
- Pittsburgh Better Times
- Pittsburgh Better Times
- Pittsburgh Better Times
- Pittsburgh Better Times
- Pittsburgh Better Times
- Pittsburgh Better Times
- Pittsburgh Better Times
- Pittsburgh Better Times
- Pittsburgh Better Times
- Pittsburgh Better Times
- Pittsburgh Better Times
- Pittsburgh Better Times
- Pittsburgh Better Times
- Pittsburgh Better Times
- Pittsburgh Better Times
- Pittsburgh Better Times
- Pittsburgh Better Times
- Pittsburgh Better Times
- Pittsburgh Better Times
- Pittsburgh Better Times
- Pittsburgh Better Times
- Pittsburgh Better Times
- Pittsburgh Better Times
- Pittsburgh Better Times
- Pittsburgh Better Times
- Pittsburgh Better Times
- Pittsburgh Better Times
- Pittsburgh Better Times
- Pittsburgh Better Times
- Pittsburgh Better Times
- Pittsburgh Better Times
- Pittsburgh Better Times
- Pittsburgh Better Times
- Pittsburgh Better Times
- Pittsburgh Better Times
- Pittsburgh Better Times
- Pittsburgh Better Times
- Pittsburgh Better Times
- Pittsburgh Better Times
- Pittsburgh Better Times
- Pittsburgh Better Times
- Pittsburgh Better Times
- Pittsburgh Better Times
- Pittsburgh Better Times
- Pittsburgh Better Times
- Pittsburgh Better Times
- Pittsburgh Better Times
- Pittsburgh Better Times
- Pittsburgh Better Times
- Pittsburgh Better Times
- Pittsburgh Better Times
- Pittsburgh Better Times
- Pittsburgh Better Times
- Pittsburgh Better Times
- Pittsburgh Better Times
- Pittsburgh Better Times
- Pittsburgh Better Times
- Pittsburgh Better Times
- Pittsburgh Better Times
- Pittsburgh Better Times
- Pittsburgh Better Times
- Pittsburgh Better Times
- Pittsburgh Better Times
- Pittsburgh Better Times
- Pittsburgh Better Times
- Pittsburgh Better Times
- Pittsburgh Better Times
- Pittsburgh Better Times
- Pittsburgh Better Times
- Pittsburgh Better Times
- Pittsburgh Better Times
- Pittsburgh Better Times
- Pittsburgh Better Times
- Pittsburgh Better Times
- Pittsburgh Better Times
- Pittsburgh Better Times
- Pittsburgh Better Times
- Pittsburgh Better Times
- Pittsburgh Better Times
- Pittsburgh Better Times
- Pittsburgh Better Times
- Pittsburgh Better Times
- Pittsburgh Better Times
- Pittsburgh Better Times
- Pittsburgh Better Times
- Pittsburgh Better Times
- Pittsburgh Better Times
- Pittsburgh Better Times
- Pittsburgh Better Times
- Pittsburgh Better Times
- Pittsburgh Better Times
- Pittsburgh Better Times
- Pittsburgh Better Times
- Pittsburgh Better Times
- Pittsburgh Better Times
- Pittsburgh Better Times
- Pittsburgh Better Times
- Pittsburgh Better Times
- Pittsburgh Better Times
- Pittsburgh Better Times
- Pittsburgh Better Times
- Pittsburgh Better Times
- Pittsburgh Better Times
- Pittsburgh Better Times
- Pittsburgh Better Times
- Pittsburgh Better Times
- Pittsburgh Better Times
- Pittsburgh Better Times
- Pittsburgh Better Times
- Pittsburgh Better Times
- Pittsburgh Better Times
- Pittsburgh Better Times
- Pittsburgh Better Times
- Pittsburgh Better Times
- Pittsburgh Better Times
- Pittsburgh Better Times
- Pittsburgh Better Times
- Pittsburgh Better Times
- Pittsburgh Better Times
- Pittsburgh Better Times
- Pittsburgh Better Times
- Pittsburgh Better Times
- Pittsburgh Better Times
- Pittsburgh Better Times
- Pittsburgh Better Times
- Pittsburgh Better Times
- Pittsburgh Better Times
- Pittsburgh Better Times
- Pittsburgh Better Times
- Pittsburgh Better Times
- Pittsburgh Better Times
- Pittsburgh Better Times
- Pittsburgh Better Times
- Pittsburgh Better Times
- Pittsburgh Better Times
- Pittsburgh Better Times
- Pittsburgh Better Times
- Pittsburgh Better Times
- Pittsburgh Better Times
- Pittsburgh Better Times
- Pittsburgh Better Times
- Pittsburgh Better Times
- Pittsburgh Better Times
- Pittsburgh Better Times
- Pittsburgh Better Times
- Pittsburgh Better Times
- Pittsburgh Better Times
- Pittsburgh Better Times
- Pittsburgh Better Times
- Pittsburgh Better Times
- Pittsburgh Better Times
- Pittsburgh Better Times
- Pittsburgh Better Times
- Pittsburgh Better Times
- Pittsburgh Better Times
- Pittsburgh Better Times
- Pittsburgh Better Times
- Pittsburgh Better Times
- Pittsburgh Better Times
- Pittsburgh Better Times
- Pittsburgh Better Times
- Pittsburgh Better Times
- Pittsburgh Better Times
- Pittsburgh Better Times
- Pittsburgh Better Times
- Pittsburgh Better Times
- Pittsburgh Better Times
- Pittsburgh Better Times
- Pittsburgh Better Times
- Pittsburgh Better Times
- Pittsburgh Better Times
- Pittsburgh Better Times
- Pittsburgh Better Times
- Pittsburgh Better Times
- Pittsburgh Better Times
- Pittsburgh Better Times
- Pittsburgh Better Times
- Pittsburgh Better Times
- Pittsburgh Better Times
- Pittsburgh Better Times
- Pittsburgh Better Times
- Pittsburgh Better Times
- Pittsburgh Better Times
- Pittsburgh Better Times
- Pittsburgh Better Times
- Pittsburgh Better Times
- Pittsburgh Better Times
- Pittsburgh Better Times
- Pittsburgh Better Times
- Pittsburgh Better Times
- Pittsburgh Better Times
- Pittsburgh Better Times
- Pittsburgh Better Times
- Pittsburgh Better Times
- Pittsburgh Better Times
- Pittsburgh Better Times
- Pittsburgh Better Times
- Pittsburgh Better Times
- Pittsburgh Better Times
- Pittsburgh Better Times
- Pittsburgh Better Times
- Pittsburgh Better Times
- Pittsburgh Better Times
- Pittsburgh Better Times
- Pittsburgh Better Times
- Pittsburgh Better Times
- Pittsburgh Better Times
- Pittsburgh Better Times
- Pittsburgh Better Times
- Pittsburgh Better Times
- Pittsburgh Better Times
- Pittsburgh Better Times
- Pittsburgh Better Times
- Pittsburgh Better Times
- Pittsburgh Better Times
- Pittsburgh Better Times
- Pittsburgh Better Times
- Pittsburgh Better Times
- Pittsburgh Better Times
- Pittsburgh Better Times
- Pittsburgh Better Times
- Pittsburgh Better Times
- Pittsburgh Better Times
- Pittsburgh Better Times
- Pittsburgh Better Times
- Pittsburgh Better Times
- Pittsburgh Better Times
- Pittsburgh Better Times
- Pittsburgh Better Times
- Pittsburgh Better Times
- Pittsburgh Better Times
- Pittsburgh Better Times
- Pittsburgh Better Times
- Pittsburgh Better Times
- Pittsburgh Better Times
- Pittsburgh Better Times
- Pittsburgh Better Times
- Pittsburgh Better Times
- Pittsburgh Better Times
- Pittsburgh Better Times
- Pittsburgh Better Times
- Pittsburgh Better Times
- Pittsburgh Better Times
- Pittsburgh Better Times
- Pittsburgh Better Times
- Pittsburgh Better Times
- Pittsburgh Better Times
- Pittsburgh Better Times
- Pittsburgh Better Times
- Pittsburgh Better Times
- Pittsburgh Better Times
- Pittsburgh Better Times
- Pittsburgh Better Times
- Pittsburgh Better Times
- Pittsburgh Better Times
- Pittsburgh Better Times
- Pittsburgh Better Times
- Pittsburgh Better Times
- Pittsburgh Better Times
- Pittsburgh Better Times
- Pittsburgh Better Times
- Pittsburgh Better Times
- Pittsburgh Better Times
- Pittsburgh Better Times
- Pittsburgh Better Times
- Pittsburgh Better Times
- Pittsburgh Better Times
- Pittsburgh Better Times
- Pittsburgh Better Times
- Pittsburgh Better Times
- Pittsburgh Better Times
- Pittsburgh Better Times
- Pittsburgh Better Times
- Pittsburgh Better Times
- Pittsburgh Better Times
- Pittsburgh Better Times
- Pittsburgh Better Times
- Pittsburgh Better Times
- Pittsburgh Better Times
- Pittsburgh Better Times
- Pittsburgh Better Times
- Pittsburgh Better Times
- Pittsburgh Better Times
- Pittsburgh Better Times
- Pittsburgh Better Times
- Pittsburgh Better Times
- Pittsburgh Better Times
- Pittsburgh Better Times
- Pittsburgh Better Times
- Pittsburgh Better Times
- Pittsburgh Better Times
- Pittsburgh Better Times
- Pittsburgh Better Times
- Pittsburgh Better Times
- Pittsburgh Better Times
- Pittsburgh Better Times
- Pittsburgh Better Times
- Pittsburgh Better Times
- Pittsburgh Better Times
- Pittsburgh Better Times
- Pittsburgh Better Times
- Pittsburgh Better Times
- Pittsburgh Better Times
- Pittsburgh Better Times
- Pittsburgh Better Times
- Pittsburgh Better Times
- Pittsburgh Better Times
- Pittsburgh Better Times
- Pittsburgh Better Times
- Pittsburgh Better Times
- Pittsburgh Better Times
- Pittsburgh Better Times
- Pittsburgh Better Times
- Pittsburgh Better Times
- Pittsburgh Better Times
- Pittsburgh Better Times
- Pittsburgh Better Times
- Pittsburgh Better Times
- Pittsburgh Better Times
- Pittsburgh Better Times
- Pittsburgh Better Times
- Pittsburgh Better Times
- Pittsburgh Better Times
- Pittsburgh Better Times
- Pittsburgh Better Times
- Pittsburgh Better Times
- Pittsburgh Better Times
- Pittsburgh Better Times
- Pittsburgh Better Times
- Pittsburgh Better Times
- Pittsburgh Better Times
- Pittsburgh Better Times
- Pittsburgh Better Times
- Pittsburgh Better Times
- Pittsburgh Better Times
- Pittsburgh Better Times
- Pittsburgh Better Times
- Pittsburgh Better Times
- Pittsburgh Better Times
- Pittsburgh Better Times
- Pittsburgh Better Times
- Pittsburgh Better Times
- Pittsburgh Better Times
- Pittsburgh Better Times
- Pittsburgh Better Times
- Pittsburgh Better Times
- Pittsburgh Better Times
- Pittsburgh Better Times
- Pittsburgh Better Times
- Pittsburgh Better Times
- Pittsburgh Better Times
- Pittsburgh Better Times
- Pittsburgh Better Times
- Pittsburgh Better Times
- Pittsburgh Better Times
- Pittsburgh Better Times
- Pittsburgh Better Times
- Pittsburgh Better Times
- Pittsburgh Better Times
- Pittsburgh Better Times
- Pittsburgh Better Times
- Pittsburgh Better Times
- Pittsburgh Better Times
- Pittsburgh Better Times
- Pittsburgh Better Times
- Pittsburgh Better Times
- Pittsburgh Better Times
- Pittsburgh Better Times
- Pittsburgh Better Times
- Pittsburgh Better Times
- Pittsburgh Better Times
- Pittsburgh Better Times
- Pittsburgh Better Times
- Pittsburgh Better Times
- Pittsburgh Better Times
- Pittsburgh Better Times
- Pittsburgh Better Times
- Pittsburgh Better Times
- Pittsburgh Better Times
- Pittsburgh Better Times
- Pittsburgh Better Times
- Pittsburgh Better Times
- Pittsburgh Better Times
- Pittsburgh Better Times
- Pittsburgh Better Times
- Pittsburgh Better Times
- Pittsburgh Better Times
- Pittsburgh Better Times
- Pittsburgh Better Times
- Pittsburgh Better Times
- Pittsburgh Better Times
- Pittsburgh Better Times
- Pittsburgh Better Times
- Pittsburgh Better Times
- Pittsburgh Better Times
- Pittsburgh Better Times
- Pittsburgh Better Times
- Pittsburgh Better Times
- Pittsburgh Better Times
- Pittsburgh Better Times
- Pittsburgh Better Times
- Pittsburgh Better Times
- Pittsburgh Better Times
- Pittsburgh Better Times
- Pittsburgh Better Times
- Pittsburgh Better Times
- Pittsburgh Better Times
- Pittsburgh Better Times
- Pittsburgh Better Times
- Pittsburgh Better Times
- Pittsburgh Better Times
- Pittsburgh Better Times
- Pittsburgh Better Times
- Pittsburgh Better Times
- Pittsburgh Better Times
- Pittsburgh Better Times
- Pittsburgh Better Times
- Pittsburgh Better Times
- Pittsburgh Better Times
- Pittsburgh Better Times
- Pittsburgh Better Times
- Pittsburgh Better Times
- Pittsburgh Better Times
- Pittsburgh Better Times
- Pittsburgh Better Times
- Pittsburgh Better Times
- Pittsburgh Better Times
- Pittsburgh Better Times
- Pittsburgh Better Times
- Pittsburgh Better Times
- Pittsburgh Better Times
- Pittsburgh Better Times
- Pittsburgh Better Times
- Pittsburgh Better Times
- Pittsburgh Better Times
- Pittsburgh Better Times
- Pittsburgh Better Times
- Pittsburgh Better Times
- Pittsburgh Better Times
- Pittsburgh Better Times
- Pittsburgh Better Times
- Pittsburgh Better Times
- Pittsburgh Better Times
- Pittsburgh Better Times
- Pittsburgh Better Times
- Pittsburgh Better Times
- Pittsburgh Better Times
- Pittsburgh Better Times
- Pittsburgh Better Times
- Pittsburgh Better Times
- Pittsburgh Better Times
- Pittsburgh Better Times
- Pittsburgh Better Times
- Pittsburgh Better Times
- Pittsburgh Better Times
- Pittsburgh Better Times
- Pittsburgh Better Times
- Pittsburgh Better Times
- Pittsburgh Better Times
- Pittsburgh Better Times
- Pittsburgh Better Times
- Pittsburgh Better Times
- Pittsburgh Better Times
- Pittsburgh Better Times
- Pittsburgh Better Times
- Pittsburgh Better Times
- Pittsburgh Better Times
- Pittsburgh Better Times
- Pittsburgh Better Times
- Pittsburgh Better Times
- Pittsburgh Better Times
- Pittsburgh Better Times
- Pittsburgh Better Times
- Pittsburgh Better Times
- Pittsburgh Better Times
- Pittsburgh Better Times
- Pittsburgh Better Times
- Pittsburgh Better Times
- Pittsburgh Better Times
- Pittsburgh Better Times
- Pittsburgh Better Times
- Pittsburgh Better Times
- Pittsburgh Better Times
- Pittsburgh Better Times
- Pittsburgh Better Times
- Pittsburgh Better Times
- Pittsburgh Better Times
- Pittsburgh Better Times
- Pittsburgh Better Times
- Pittsburgh Better Times
- Pittsburgh Better Times
- Pittsburgh Better Times
- Pittsburgh Better Times
- Pittsburgh Better Times
- Pittsburgh Better Times
- Pittsburgh Better Times
- Pittsburgh Better Times
- Pittsburgh Better Times
- Pittsburgh Better Times
- Pittsburgh Better Times
- Pittsburgh Better Times
- Pittsburgh Better Times
- Pittsburgh Better Times
- Pittsburgh Better Times
- Pittsburgh Better Times
- Pittsburgh Better Times
- Pittsburgh Better Times
- Pittsburgh Better Times
- Pittsburgh Better Times
- Pittsburgh Better Times
- Pittsburgh Better Times
- Pittsburgh Better Times
- Pittsburgh Better Times
- Pittsburgh Better Times
- Pittsburgh Better Times
- Pittsburgh Better Times
- Pittsburgh Better Times
- Pittsburgh Better Times
- Pittsburgh Better Times
- Pittsburgh Better Times
- Pittsburgh Better Times
- Pittsburgh Better Times
- Pittsburgh Better Times
- Pittsburgh Better Times
- Pittsburgh Better Times
- Pittsburgh Better Times
- Pittsburgh Better Times
- Pittsburgh Better Times
- Pittsburgh Better Times
- Pittsburgh Better Times
- Pittsburgh Better Times
- Pittsburgh Better Times
- Pittsburgh Better Times
- Pittsburgh Better Times
- Pittsburgh Better Times
- Pittsburgh Better Times
- Pittsburgh Better Times
- Pittsburgh Better Times
- Pittsburgh Better Times
- Pittsburgh Better Times
- Pittsburgh Better Times
- Pittsburgh Better Times
- Pittsburgh Better Times
- Pittsburgh Better Times
- Pittsburgh Better Times
- Pittsburgh Better Times
- Pittsburgh Better Times
- Pittsburgh Better Times
- Pittsburgh Better Times
- Pittsburgh Better Times
- Pittsburgh Better Times
- Pittsburgh Better Times
- Pittsburgh Better Times
- Pittsburgh Better Times
- Pittsburgh Better Times
- Pittsburgh Better Times
- Pittsburgh Better Times
- Pittsburgh Better Times
- Pittsburgh Better Times
- Pittsburgh Better Times
- Pittsburgh Better Times
- Pittsburgh Better Times
- Pittsburgh Better Times
- Pittsburgh Better Times
- Pittsburgh Better Times
- Pittsburgh Better Times
- Pittsburgh Better Times
- Pittsburgh Better Times
- Pittsburgh Better Times
- Pittsburgh Better Times
- Pittsburgh Better Times
- Pittsburgh Better Times
- Pittsburgh Better Times
- Pittsburgh Better Times
- Pittsburgh Better Times
- Pittsburgh Better Times
- Pittsburgh Better Times
- Pittsburgh Better Times
- Pittsburgh Better Times
- Pittsburgh Better Times
- Pittsburgh Better Times
- Pittsburgh Better Times
- Pittsburgh Better Times
- Pittsburgh Better Times
- Pittsburgh Better Times
- Pittsburgh Better Times
- Pittsburgh Better Times
- Pittsburgh Better Times
- Pittsburgh Better Times
- Pittsburgh Better Times
- Pittsburgh Better Times
- Pittsburgh Better Times
- Pittsburgh Better Times
- Pittsburgh Better Times
- Pittsburgh Better Times
- Pittsburgh Better Times


