Washing your custom motorcycle maintains its unique features and makes it look great. Our complete guide to washing your custom motorcycle will help you preserve its condition and protect components from wear and corrosion.
Gather Your Supplies
Before the cleaning process, gather the following supplies:
- Mild motorcycle soap
- Two buckets (one for soapy water and one for rinsing)
- Soft microfiber wash mitts or sponges
- A soft-bristle brush for tough spots
- Stainless steel cleaner (if your bike has these components)
- Drying towels (preferably microfiber)
- Wheel cleaner and tire brush
- A hose or pressure washer with a gentle spray
Getting your tools and cleaning supplies together before you begin makes the washing process smoother and more efficient. Always avoid using harsh chemicals or dish soap, as they can strip away protective coatings on custom parts.
Washing the Motorcycle
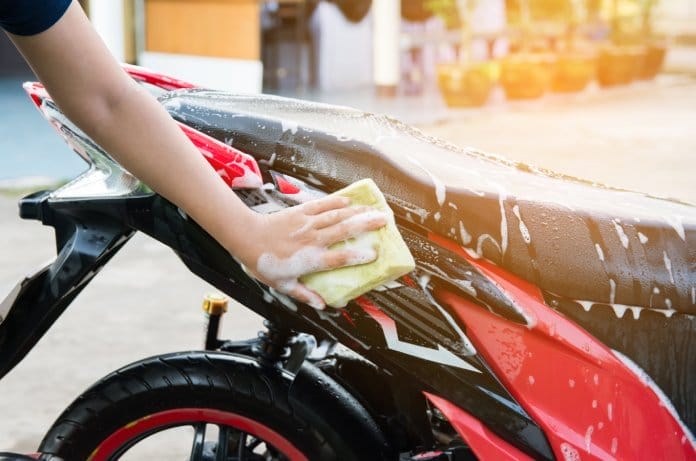
Begin by flushing out any loose dirt and debris with a gentle rinse. This step prevents scratching the paint during washing.
Next, fill one bucket with water and add motorcycle soap. The second bucket should contain fresh water for rinsing mitts or sponges. Using a microfiber mitt soaked in soapy water, wash the motorcycle from top to bottom. Focus on the gas tank, fenders, and side panels.
When cleaning, apply light pressure to avoid damaging the finish. Rinse your mitt in the fresh water bucket frequently to prevent dirt from transferring back onto the bike.
After washing the body, pay special attention to areas that accumulate grime, such as the chain and sprockets. Gently scrub these parts with a soft-bristle brush. For the best results, follow the manufacturer’s instructions regarding chain cleaning and lubrication.
Cleaning Stainless Steel Motorcycle Parts
Custom stainless steel components on your motorcycle require special attention. While resistant to rust and corrosion, they still accumulate dirt, grime, and fingerprints. Use a stainless steel cleaner on these parts. Apply the cleaner with a soft cloth, using circular motions to lift dirt without scratching the surface.
For more stubborn stains or tarnish, you can use fine steel wool or a non-abrasive pad. Always follow up with a microfiber towel to remove residue and restore the shine. Incorporating stainless steel maintenance and cleaning into your routine will keep your motorcycle looking fantastic!
Rinse and Dry
Once you’ve thoroughly washed all parts, it’s time to rinse. Use a hose on a low setting to wash away all the soap and cleaning products. Be cautious around sensitive components, such as electrical connections and bearings, to keep water from penetrating where it shouldn’t.
After rinsing, dry your motorcycle using microfiber towels. Start at the top and work your way down to prevent water spots from forming. Pay special attention to crevices and hidden areas where water may collect.
Final Touches and Waxing
After drying, you could apply motorcycle wax or sealant. This step adds protection against the elements and makes future cleaning easier. For additional protection, consider using a specialized spray for custom motorcycles, which can enhance the shine while providing a barrier against dirt and grime.
Washing your custom motorcycle requires careful attention and the right techniques. Our complete guide to washing your custom motorcycle explains how to keep your bike in pristine condition, reflecting your passion for your ride.
- Pittsburgh Better Times
- Pittsburgh Better Times
- Pittsburgh Better Times
- Pittsburgh Better Times
- Pittsburgh Better Times
- Pittsburgh Better Times
- Pittsburgh Better Times
- Pittsburgh Better Times
- Pittsburgh Better Times
- Pittsburgh Better Times
- Pittsburgh Better Times
- Pittsburgh Better Times
- Pittsburgh Better Times
- Pittsburgh Better Times
- Pittsburgh Better Times
- Pittsburgh Better Times
- Pittsburgh Better Times
- Pittsburgh Better Times
- Pittsburgh Better Times
- Pittsburgh Better Times
- Pittsburgh Better Times
- Pittsburgh Better Times
- Pittsburgh Better Times
- Pittsburgh Better Times
- Pittsburgh Better Times
- Pittsburgh Better Times
- Pittsburgh Better Times
- Pittsburgh Better Times
- Pittsburgh Better Times
- Pittsburgh Better Times
- Pittsburgh Better Times
- Pittsburgh Better Times
- Pittsburgh Better Times
- Pittsburgh Better Times
- Pittsburgh Better Times
- Pittsburgh Better Times
- Pittsburgh Better Times
- Pittsburgh Better Times
- Pittsburgh Better Times
- Pittsburgh Better Times
- Pittsburgh Better Times
- Pittsburgh Better Times
- Pittsburgh Better Times
- Pittsburgh Better Times
- Pittsburgh Better Times
- Pittsburgh Better Times
- Pittsburgh Better Times
- Pittsburgh Better Times
- Pittsburgh Better Times
- Pittsburgh Better Times
- Pittsburgh Better Times
- Pittsburgh Better Times
- Pittsburgh Better Times
- Pittsburgh Better Times
- Pittsburgh Better Times
- Pittsburgh Better Times
- Pittsburgh Better Times
- Pittsburgh Better Times
- Pittsburgh Better Times
- Pittsburgh Better Times
- Pittsburgh Better Times
- Pittsburgh Better Times
- Pittsburgh Better Times
- Pittsburgh Better Times
- Pittsburgh Better Times
- Pittsburgh Better Times
- Pittsburgh Better Times
- Pittsburgh Better Times
- Pittsburgh Better Times
- Pittsburgh Better Times
- Pittsburgh Better Times
- Pittsburgh Better Times
- Pittsburgh Better Times
- Pittsburgh Better Times
- Pittsburgh Better Times
- Pittsburgh Better Times
- Pittsburgh Better Times
- Pittsburgh Better Times
- Pittsburgh Better Times
- Pittsburgh Better Times
- Pittsburgh Better Times
- Pittsburgh Better Times
- Pittsburgh Better Times
- Pittsburgh Better Times
- Pittsburgh Better Times
- Pittsburgh Better Times
- Pittsburgh Better Times
- Pittsburgh Better Times
- Pittsburgh Better Times
- Pittsburgh Better Times
- Pittsburgh Better Times
- Pittsburgh Better Times
- Pittsburgh Better Times
- Pittsburgh Better Times
- Pittsburgh Better Times
- Pittsburgh Better Times
- Pittsburgh Better Times
- Pittsburgh Better Times
- Pittsburgh Better Times
- Pittsburgh Better Times
- Pittsburgh Better Times
- Pittsburgh Better Times
- Pittsburgh Better Times
- Pittsburgh Better Times
- Pittsburgh Better Times
- Pittsburgh Better Times
- Pittsburgh Better Times
- Pittsburgh Better Times
- Pittsburgh Better Times
- Pittsburgh Better Times
- Pittsburgh Better Times
- Pittsburgh Better Times
- Pittsburgh Better Times
- Pittsburgh Better Times
- Pittsburgh Better Times
- Pittsburgh Better Times
- Pittsburgh Better Times
- Pittsburgh Better Times
- Pittsburgh Better Times
- Pittsburgh Better Times
- Pittsburgh Better Times
- Pittsburgh Better Times
- Pittsburgh Better Times
- Pittsburgh Better Times
- Pittsburgh Better Times
- Pittsburgh Better Times
- Pittsburgh Better Times
- Pittsburgh Better Times
- Pittsburgh Better Times
- Pittsburgh Better Times
- Pittsburgh Better Times
- Pittsburgh Better Times
- Pittsburgh Better Times
- Pittsburgh Better Times
- Pittsburgh Better Times
- Pittsburgh Better Times
- Pittsburgh Better Times
- Pittsburgh Better Times
- Pittsburgh Better Times
- Pittsburgh Better Times
- Pittsburgh Better Times
- Pittsburgh Better Times
- Pittsburgh Better Times
- Pittsburgh Better Times
- Pittsburgh Better Times
- Pittsburgh Better Times
- Pittsburgh Better Times
- Pittsburgh Better Times
- Pittsburgh Better Times
- Pittsburgh Better Times
- Pittsburgh Better Times
- Pittsburgh Better Times
- Pittsburgh Better Times
- Pittsburgh Better Times
- Pittsburgh Better Times
- Pittsburgh Better Times
- Pittsburgh Better Times
- Pittsburgh Better Times
- Pittsburgh Better Times
- Pittsburgh Better Times
- Pittsburgh Better Times
- Pittsburgh Better Times
- Pittsburgh Better Times
- Pittsburgh Better Times
- Pittsburgh Better Times
- Pittsburgh Better Times
- Pittsburgh Better Times
- Pittsburgh Better Times
- Pittsburgh Better Times
- Pittsburgh Better Times
- Pittsburgh Better Times
- Pittsburgh Better Times
- Pittsburgh Better Times
- Pittsburgh Better Times
- Pittsburgh Better Times
- Pittsburgh Better Times
- Pittsburgh Better Times
- Pittsburgh Better Times
- Pittsburgh Better Times
- Pittsburgh Better Times
- Pittsburgh Better Times
- Pittsburgh Better Times
- Pittsburgh Better Times
- Pittsburgh Better Times
- Pittsburgh Better Times
- Pittsburgh Better Times
- Pittsburgh Better Times
- Pittsburgh Better Times
- Pittsburgh Better Times
- Pittsburgh Better Times
- Pittsburgh Better Times
- Pittsburgh Better Times
- Pittsburgh Better Times
- Pittsburgh Better Times
- Pittsburgh Better Times
- Pittsburgh Better Times
- Pittsburgh Better Times
- Pittsburgh Better Times
- Pittsburgh Better Times
- Pittsburgh Better Times
- Pittsburgh Better Times
- Pittsburgh Better Times
- Pittsburgh Better Times
- Pittsburgh Better Times
- Pittsburgh Better Times
- Pittsburgh Better Times
- Pittsburgh Better Times
- Pittsburgh Better Times
- Pittsburgh Better Times
- Pittsburgh Better Times
- Pittsburgh Better Times
- Pittsburgh Better Times
- Pittsburgh Better Times
- Pittsburgh Better Times
- Pittsburgh Better Times
- Pittsburgh Better Times
- Pittsburgh Better Times
- Pittsburgh Better Times
- Pittsburgh Better Times
- Pittsburgh Better Times
- Pittsburgh Better Times
- Pittsburgh Better Times
- Pittsburgh Better Times
- Pittsburgh Better Times
- Pittsburgh Better Times
- Pittsburgh Better Times
- Pittsburgh Better Times
- Pittsburgh Better Times
- Pittsburgh Better Times
- Pittsburgh Better Times
- Pittsburgh Better Times
- Pittsburgh Better Times
- Pittsburgh Better Times
- Pittsburgh Better Times
- Pittsburgh Better Times
- Pittsburgh Better Times
- Pittsburgh Better Times
- Pittsburgh Better Times
- Pittsburgh Better Times
- Pittsburgh Better Times
- Pittsburgh Better Times
- Pittsburgh Better Times
- Pittsburgh Better Times
- Pittsburgh Better Times
- Pittsburgh Better Times
- Pittsburgh Better Times
- Pittsburgh Better Times
- Pittsburgh Better Times
- Pittsburgh Better Times
- Pittsburgh Better Times
- Pittsburgh Better Times
- Pittsburgh Better Times
- Pittsburgh Better Times
- Pittsburgh Better Times
- Pittsburgh Better Times
- Pittsburgh Better Times
- Pittsburgh Better Times
- Pittsburgh Better Times
- Pittsburgh Better Times
- Pittsburgh Better Times
- Pittsburgh Better Times
- Pittsburgh Better Times
- Pittsburgh Better Times
- Pittsburgh Better Times
- Pittsburgh Better Times
- Pittsburgh Better Times
- Pittsburgh Better Times
- Pittsburgh Better Times
- Pittsburgh Better Times
- Pittsburgh Better Times
- Pittsburgh Better Times
- Pittsburgh Better Times
- Pittsburgh Better Times
- Pittsburgh Better Times
- Pittsburgh Better Times
- Pittsburgh Better Times
- Pittsburgh Better Times
- Pittsburgh Better Times
- Pittsburgh Better Times
- Pittsburgh Better Times
- Pittsburgh Better Times
- Pittsburgh Better Times
- Pittsburgh Better Times
- Pittsburgh Better Times
- Pittsburgh Better Times
- Pittsburgh Better Times
- Pittsburgh Better Times
- Pittsburgh Better Times
- Pittsburgh Better Times
- Pittsburgh Better Times
- Pittsburgh Better Times
- Pittsburgh Better Times
- Pittsburgh Better Times
- Pittsburgh Better Times
- Pittsburgh Better Times
- Pittsburgh Better Times
- Pittsburgh Better Times
- Pittsburgh Better Times
- Pittsburgh Better Times
- Pittsburgh Better Times
- Pittsburgh Better Times
- Pittsburgh Better Times
- Pittsburgh Better Times
- Pittsburgh Better Times
- Pittsburgh Better Times
- Pittsburgh Better Times
- Pittsburgh Better Times
- Pittsburgh Better Times
- Pittsburgh Better Times
- Pittsburgh Better Times
- Pittsburgh Better Times
- Pittsburgh Better Times
- Pittsburgh Better Times
- Pittsburgh Better Times
- Pittsburgh Better Times
- Pittsburgh Better Times
- Pittsburgh Better Times
- Pittsburgh Better Times
- Pittsburgh Better Times
- Pittsburgh Better Times
- Pittsburgh Better Times
- Pittsburgh Better Times
- Pittsburgh Better Times
- Pittsburgh Better Times
- Pittsburgh Better Times
- Pittsburgh Better Times
- Pittsburgh Better Times
- Pittsburgh Better Times
- Pittsburgh Better Times
- Pittsburgh Better Times
- Pittsburgh Better Times
- Pittsburgh Better Times
- Pittsburgh Better Times
- Pittsburgh Better Times
- Pittsburgh Better Times
- Pittsburgh Better Times
- Pittsburgh Better Times
- Pittsburgh Better Times
- Pittsburgh Better Times
- Pittsburgh Better Times
- Pittsburgh Better Times
- Pittsburgh Better Times
- Pittsburgh Better Times
- Pittsburgh Better Times
- Pittsburgh Better Times
- Pittsburgh Better Times
- Pittsburgh Better Times
- Pittsburgh Better Times
- Pittsburgh Better Times
- Pittsburgh Better Times
- Pittsburgh Better Times
- Pittsburgh Better Times
- Pittsburgh Better Times
- Pittsburgh Better Times
- Pittsburgh Better Times
- Pittsburgh Better Times
- Pittsburgh Better Times
- Pittsburgh Better Times
- Pittsburgh Better Times
- Pittsburgh Better Times
- Pittsburgh Better Times
- Pittsburgh Better Times
- Pittsburgh Better Times
- Pittsburgh Better Times
- Pittsburgh Better Times
- Pittsburgh Better Times
- Pittsburgh Better Times
- Pittsburgh Better Times
- Pittsburgh Better Times
- Pittsburgh Better Times
- Pittsburgh Better Times
- Pittsburgh Better Times
- Pittsburgh Better Times
- Pittsburgh Better Times
- Pittsburgh Better Times
- Pittsburgh Better Times
- Pittsburgh Better Times
- Pittsburgh Better Times
- Pittsburgh Better Times
- Pittsburgh Better Times
- Pittsburgh Better Times
- Pittsburgh Better Times
- Pittsburgh Better Times
- Pittsburgh Better Times
- Pittsburgh Better Times
- Pittsburgh Better Times
- Pittsburgh Better Times
- Pittsburgh Better Times
- Pittsburgh Better Times
- Pittsburgh Better Times
- Pittsburgh Better Times
- Pittsburgh Better Times
- Pittsburgh Better Times
- Pittsburgh Better Times
- Pittsburgh Better Times
- Pittsburgh Better Times
- Pittsburgh Better Times
- Pittsburgh Better Times
- Pittsburgh Better Times
- Pittsburgh Better Times
- Pittsburgh Better Times
- Pittsburgh Better Times
- Pittsburgh Better Times
- Pittsburgh Better Times
- Pittsburgh Better Times
- Pittsburgh Better Times
- Pittsburgh Better Times
- Pittsburgh Better Times
- Pittsburgh Better Times
- Pittsburgh Better Times
- Pittsburgh Better Times
- Pittsburgh Better Times
- Pittsburgh Better Times
- Pittsburgh Better Times
- Pittsburgh Better Times
- Pittsburgh Better Times
- Pittsburgh Better Times
- Pittsburgh Better Times
- Pittsburgh Better Times
- Pittsburgh Better Times
- Pittsburgh Better Times
- Pittsburgh Better Times
- Pittsburgh Better Times
- Pittsburgh Better Times
- Pittsburgh Better Times
- Pittsburgh Better Times
- Pittsburgh Better Times
- Pittsburgh Better Times
- Pittsburgh Better Times
- Pittsburgh Better Times
- Pittsburgh Better Times
- Pittsburgh Better Times
- Pittsburgh Better Times
- Pittsburgh Better Times
- Pittsburgh Better Times
- Pittsburgh Better Times
- Pittsburgh Better Times
- Pittsburgh Better Times
- Pittsburgh Better Times
- Pittsburgh Better Times
- Pittsburgh Better Times
- Pittsburgh Better Times
- Pittsburgh Better Times
- Pittsburgh Better Times
- Pittsburgh Better Times
- Pittsburgh Better Times
- Pittsburgh Better Times
- Pittsburgh Better Times
- Pittsburgh Better Times
- Pittsburgh Better Times
- Pittsburgh Better Times
- Pittsburgh Better Times
- Pittsburgh Better Times
- Pittsburgh Better Times
- Pittsburgh Better Times
- Pittsburgh Better Times
- Pittsburgh Better Times
- Pittsburgh Better Times
- Pittsburgh Better Times
- Pittsburgh Better Times
- Pittsburgh Better Times
- Pittsburgh Better Times
- Pittsburgh Better Times
- Pittsburgh Better Times
- Pittsburgh Better Times
- Pittsburgh Better Times
- Pittsburgh Better Times
- Pittsburgh Better Times
- Pittsburgh Better Times
- Pittsburgh Better Times
- Pittsburgh Better Times
- Pittsburgh Better Times
- Pittsburgh Better Times
- Pittsburgh Better Times
- Pittsburgh Better Times
- Pittsburgh Better Times
- Pittsburgh Better Times
- Pittsburgh Better Times
- Pittsburgh Better Times
- Pittsburgh Better Times
- Pittsburgh Better Times
- Pittsburgh Better Times
- Pittsburgh Better Times
- Pittsburgh Better Times
- Pittsburgh Better Times
- Pittsburgh Better Times
- Pittsburgh Better Times
- Pittsburgh Better Times
- Pittsburgh Better Times
- Pittsburgh Better Times
- Pittsburgh Better Times
- Pittsburgh Better Times
- Pittsburgh Better Times
- Pittsburgh Better Times
- Pittsburgh Better Times
- Pittsburgh Better Times
- Pittsburgh Better Times
- Pittsburgh Better Times
- Pittsburgh Better Times
- Pittsburgh Better Times
- Pittsburgh Better Times
- Pittsburgh Better Times
- Pittsburgh Better Times
- Pittsburgh Better Times
- Pittsburgh Better Times
- Pittsburgh Better Times
- Pittsburgh Better Times
- Pittsburgh Better Times
- Pittsburgh Better Times
- Pittsburgh Better Times
- Pittsburgh Better Times
- Pittsburgh Better Times
- Pittsburgh Better Times
- Pittsburgh Better Times
- Pittsburgh Better Times
- Pittsburgh Better Times
- Pittsburgh Better Times
- Pittsburgh Better Times
- Pittsburgh Better Times
- Pittsburgh Better Times
- Pittsburgh Better Times
- Pittsburgh Better Times
- Pittsburgh Better Times
- Pittsburgh Better Times
- Pittsburgh Better Times
- Pittsburgh Better Times
- Pittsburgh Better Times
- Pittsburgh Better Times
- Pittsburgh Better Times
- Pittsburgh Better Times
- Pittsburgh Better Times
- Pittsburgh Better Times
- Pittsburgh Better Times
- Pittsburgh Better Times
- Pittsburgh Better Times
- Pittsburgh Better Times
- Pittsburgh Better Times
- Pittsburgh Better Times
- Pittsburgh Better Times
- Pittsburgh Better Times
- Pittsburgh Better Times
- Pittsburgh Better Times
- Pittsburgh Better Times
- Pittsburgh Better Times
- Pittsburgh Better Times
- Pittsburgh Better Times
- Pittsburgh Better Times
- Pittsburgh Better Times
- Pittsburgh Better Times
- Pittsburgh Better Times
- Pittsburgh Better Times
- Pittsburgh Better Times
- Pittsburgh Better Times
- Pittsburgh Better Times
- Pittsburgh Better Times
- Pittsburgh Better Times
- Pittsburgh Better Times
- Pittsburgh Better Times
- Pittsburgh Better Times
- Pittsburgh Better Times
- Pittsburgh Better Times
- Pittsburgh Better Times
- Pittsburgh Better Times
- Pittsburgh Better Times
- Pittsburgh Better Times
- Pittsburgh Better Times
- Pittsburgh Better Times
- Pittsburgh Better Times
- Pittsburgh Better Times
- Pittsburgh Better Times
- Pittsburgh Better Times
- Pittsburgh Better Times
- Pittsburgh Better Times
- Pittsburgh Better Times
- Pittsburgh Better Times
- Pittsburgh Better Times
- Pittsburgh Better Times
- Pittsburgh Better Times
- Pittsburgh Better Times
- Pittsburgh Better Times
- Pittsburgh Better Times
- Pittsburgh Better Times
- Pittsburgh Better Times
- Pittsburgh Better Times
- Pittsburgh Better Times
- Pittsburgh Better Times
- Pittsburgh Better Times
- Pittsburgh Better Times
- Pittsburgh Better Times
- Pittsburgh Better Times
- Pittsburgh Better Times
- Pittsburgh Better Times
- Pittsburgh Better Times
- Pittsburgh Better Times
- Pittsburgh Better Times
- Pittsburgh Better Times
- Pittsburgh Better Times
- Pittsburgh Better Times
- Pittsburgh Better Times
- Pittsburgh Better Times
- Pittsburgh Better Times
- Pittsburgh Better Times
- Pittsburgh Better Times
- Pittsburgh Better Times
- Pittsburgh Better Times
- Pittsburgh Better Times
- Pittsburgh Better Times
- Pittsburgh Better Times
- Pittsburgh Better Times
- Pittsburgh Better Times
- Pittsburgh Better Times
- Pittsburgh Better Times
- Pittsburgh Better Times
- Pittsburgh Better Times
- Pittsburgh Better Times
- Pittsburgh Better Times
- Pittsburgh Better Times
- Pittsburgh Better Times
- Pittsburgh Better Times
- Pittsburgh Better Times
- Pittsburgh Better Times
- Pittsburgh Better Times
- Pittsburgh Better Times
- Pittsburgh Better Times
- Pittsburgh Better Times
- Pittsburgh Better Times
- Pittsburgh Better Times
- Pittsburgh Better Times
- Pittsburgh Better Times
- Pittsburgh Better Times
- Pittsburgh Better Times
- Pittsburgh Better Times
- Pittsburgh Better Times
- Pittsburgh Better Times
- Pittsburgh Better Times
- Pittsburgh Better Times
- Pittsburgh Better Times
- Pittsburgh Better Times
- Pittsburgh Better Times
- Pittsburgh Better Times
- Pittsburgh Better Times
- Pittsburgh Better Times
- Pittsburgh Better Times
- Pittsburgh Better Times
- Pittsburgh Better Times
- Pittsburgh Better Times
- Pittsburgh Better Times
- Pittsburgh Better Times
- Pittsburgh Better Times
- Pittsburgh Better Times
- Pittsburgh Better Times
- Pittsburgh Better Times
- Pittsburgh Better Times
- Pittsburgh Better Times
- Pittsburgh Better Times
- Pittsburgh Better Times
- Pittsburgh Better Times
- Pittsburgh Better Times
- Pittsburgh Better Times
- Pittsburgh Better Times
- Pittsburgh Better Times
- Pittsburgh Better Times
- Pittsburgh Better Times
- Pittsburgh Better Times
- Pittsburgh Better Times
- Pittsburgh Better Times
- Pittsburgh Better Times
- Pittsburgh Better Times
- Pittsburgh Better Times
- Pittsburgh Better Times
- Pittsburgh Better Times
- Pittsburgh Better Times
- Pittsburgh Better Times
- Pittsburgh Better Times
- Pittsburgh Better Times
- Pittsburgh Better Times
- Pittsburgh Better Times
- Pittsburgh Better Times
- Pittsburgh Better Times
- Pittsburgh Better Times
- Pittsburgh Better Times
- Pittsburgh Better Times
- Pittsburgh Better Times
- Pittsburgh Better Times
- Pittsburgh Better Times
- Pittsburgh Better Times
- Pittsburgh Better Times
- Pittsburgh Better Times
- Pittsburgh Better Times
- Pittsburgh Better Times
- Pittsburgh Better Times
- Pittsburgh Better Times
- Pittsburgh Better Times
- Pittsburgh Better Times
- Pittsburgh Better Times
- Pittsburgh Better Times
- Pittsburgh Better Times
- Pittsburgh Better Times
- Pittsburgh Better Times
- Pittsburgh Better Times
- Pittsburgh Better Times
- Pittsburgh Better Times
- Pittsburgh Better Times
- Pittsburgh Better Times
- Pittsburgh Better Times
- Pittsburgh Better Times
- Pittsburgh Better Times
- Pittsburgh Better Times
- Pittsburgh Better Times
- Pittsburgh Better Times
- Pittsburgh Better Times
- Pittsburgh Better Times
- Pittsburgh Better Times
- Pittsburgh Better Times
- Pittsburgh Better Times
- Pittsburgh Better Times
- Pittsburgh Better Times
- Pittsburgh Better Times
- Pittsburgh Better Times
- Pittsburgh Better Times
- Pittsburgh Better Times
- Pittsburgh Better Times
- Pittsburgh Better Times
- Pittsburgh Better Times
- Pittsburgh Better Times
- Pittsburgh Better Times
- Pittsburgh Better Times
- Pittsburgh Better Times
- Pittsburgh Better Times
- Pittsburgh Better Times
- Pittsburgh Better Times
- Pittsburgh Better Times
- Pittsburgh Better Times
- Pittsburgh Better Times
- Pittsburgh Better Times
- Pittsburgh Better Times
- Pittsburgh Better Times
- Pittsburgh Better Times
- Pittsburgh Better Times
- Pittsburgh Better Times
- Pittsburgh Better Times
- Pittsburgh Better Times
- Pittsburgh Better Times
- Pittsburgh Better Times
- Pittsburgh Better Times
- Pittsburgh Better Times
- Pittsburgh Better Times
- Pittsburgh Better Times
- Pittsburgh Better Times
- Pittsburgh Better Times
- Pittsburgh Better Times
- Pittsburgh Better Times
- Pittsburgh Better Times
- Pittsburgh Better Times
- Pittsburgh Better Times
- Pittsburgh Better Times
- Pittsburgh Better Times
- Pittsburgh Better Times
- Pittsburgh Better Times
- Pittsburgh Better Times
- Pittsburgh Better Times
- Pittsburgh Better Times
- Pittsburgh Better Times
- Pittsburgh Better Times
- Pittsburgh Better Times
- Pittsburgh Better Times
- Pittsburgh Better Times
- Pittsburgh Better Times
- Pittsburgh Better Times
- Pittsburgh Better Times
- Pittsburgh Better Times
- Pittsburgh Better Times
- Pittsburgh Better Times
- Pittsburgh Better Times
- Pittsburgh Better Times
- Pittsburgh Better Times
- Pittsburgh Better Times
- Pittsburgh Better Times
- Pittsburgh Better Times
- Pittsburgh Better Times
- Pittsburgh Better Times
- Pittsburgh Better Times
- Pittsburgh Better Times
- Pittsburgh Better Times
- Pittsburgh Better Times
- Pittsburgh Better Times
- Pittsburgh Better Times
- Pittsburgh Better Times
- Pittsburgh Better Times
- Pittsburgh Better Times
- Pittsburgh Better Times
- Pittsburgh Better Times
- Pittsburgh Better Times
- Pittsburgh Better Times
- Pittsburgh Better Times
- Pittsburgh Better Times
- Pittsburgh Better Times
- Pittsburgh Better Times
- Pittsburgh Better Times
- Pittsburgh Better Times
- Pittsburgh Better Times
- Pittsburgh Better Times
- Pittsburgh Better Times
- Pittsburgh Better Times
- Pittsburgh Better Times
- Pittsburgh Better Times
- Pittsburgh Better Times
- Pittsburgh Better Times
- Pittsburgh Better Times
- Pittsburgh Better Times
- Pittsburgh Better Times
- Pittsburgh Better Times
- Pittsburgh Better Times
- Pittsburgh Better Times
- Pittsburgh Better Times
- Pittsburgh Better Times
- Pittsburgh Better Times
- Pittsburgh Better Times
- Pittsburgh Better Times
- Pittsburgh Better Times
- Pittsburgh Better Times
- Pittsburgh Better Times
- Pittsburgh Better Times
- Pittsburgh Better Times
- Pittsburgh Better Times
- Pittsburgh Better Times
- Pittsburgh Better Times
- Pittsburgh Better Times
- Pittsburgh Better Times
- Pittsburgh Better Times
- Pittsburgh Better Times
- Pittsburgh Better Times
- Pittsburgh Better Times
- Pittsburgh Better Times
- Pittsburgh Better Times
- Pittsburgh Better Times
- Pittsburgh Better Times
- Pittsburgh Better Times
- Pittsburgh Better Times
- Pittsburgh Better Times
- Pittsburgh Better Times
- Pittsburgh Better Times
- Pittsburgh Better Times
- Pittsburgh Better Times
- Pittsburgh Better Times
- Pittsburgh Better Times
- Pittsburgh Better Times
- Pittsburgh Better Times
- Pittsburgh Better Times
- Pittsburgh Better Times
- Pittsburgh Better Times
- Pittsburgh Better Times
- Pittsburgh Better Times
- Pittsburgh Better Times
- Pittsburgh Better Times
- Pittsburgh Better Times
- Pittsburgh Better Times
- Pittsburgh Better Times
- Pittsburgh Better Times
- Pittsburgh Better Times
- Pittsburgh Better Times
- Pittsburgh Better Times
- Pittsburgh Better Times
- Pittsburgh Better Times
- Pittsburgh Better Times
- Pittsburgh Better Times
- Pittsburgh Better Times
- Pittsburgh Better Times
- Pittsburgh Better Times
- Pittsburgh Better Times
- Pittsburgh Better Times
- Pittsburgh Better Times
- Pittsburgh Better Times
- Pittsburgh Better Times
- Pittsburgh Better Times
- Pittsburgh Better Times
- Pittsburgh Better Times
- Pittsburgh Better Times
- Pittsburgh Better Times
- Pittsburgh Better Times
- Pittsburgh Better Times
- Pittsburgh Better Times
- Pittsburgh Better Times
- Pittsburgh Better Times
- Pittsburgh Better Times
- Pittsburgh Better Times
- Pittsburgh Better Times
- Pittsburgh Better Times
- Pittsburgh Better Times
- Pittsburgh Better Times
- Pittsburgh Better Times
- Pittsburgh Better Times
- Pittsburgh Better Times
- Pittsburgh Better Times
- Pittsburgh Better Times
- Pittsburgh Better Times
- Pittsburgh Better Times
- Pittsburgh Better Times
- Pittsburgh Better Times
- Pittsburgh Better Times
- Pittsburgh Better Times
- Pittsburgh Better Times
- Pittsburgh Better Times
- Pittsburgh Better Times
- Pittsburgh Better Times
- Pittsburgh Better Times
- Pittsburgh Better Times
- Pittsburgh Better Times
- Pittsburgh Better Times
- Pittsburgh Better Times
- Pittsburgh Better Times


